As I said last week, the process of creating the lightsaber effect in After Effects CS4 is a pretty involved one. I now understand, to an extent, what the cubicle-isolated folks over at ILM must feel like when George Lucas tells them he wants Yoda to look a bit more “shy” or “calculating.” Every detail is carefully thought-out, and the audience doesn’t have time to notice most of those details when they watch the final film. They’d only notice if something were missing – ruining the illusion.
Lucky for me, there’s no real illusion here. That’s why I – and people like Jon Stewart – stick to mocking the establishment with satire rather than trying to create an entirely new idea/process/style. I have nothing against Jon Stewart or other satirists, but I often wonder just how many people could do the job that they criticize (whether that’s the news, public office, filmmaking, etc.). It’s just a nice breath of fresh air when you can inject comedy into something very serious. [and…we’re back off the soap box.]
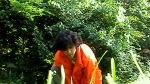
Here we are in After Effects CS4, close-up on a shot of Brad as he walks with his lightsaber laying casually over his shoulder. There are at least six of these shots where the lightsaber has to be motion-tracked the entire time that brad is talking. Remember to think ahead when you shoot! This would be an excellent example of a scene where the work involved in creating the effect is NOT worth the humor. All the same, it’s good for a chuckle… and it’s already shot so we can’t go back now.
Create a “white solid” and add it to your timeline above the video layer. Then create a “black solid” and add it below your video layer. The screen goes white, of course. Now, click on the “eye” icon to the far left of that layer, making it invisible. Add a “mask” to the white solid and trace the mask around the shape of the lightsaber. You just need a quadrilateral at first, with four points. Don’t worry about rounding out the two ends of the lightsaber until later. (To test this, click on the eye again to reveal the white layer, which should now cover all of the lightsaber, excepting the small areas at the ends that haven’t been rounded yet).
Repeat this process for every frame in your shot. Then, go back to the beginning of the shot, add one or two (don’t go overboard) more points in the mask outline to each end, making the shape closer to the rounded edge shape of the ends. Use the rounded-edge tool under the “pen” icon in your tool panel at the top (ctrl+G) and click on each of these new points to automatically complete the roundness of your mask. Now, when you watch the whole scene (with the white solid visible), you should have a crude version of your lightsaber. Now we need to make it glow – which has the added bonus of covering up any minor errors we made which may have reveals a bit of the original lightsaber in the video.
Now, go back to that mask in your timeline. Copy the white solid that the mask belongs to about 5 times above your video in the timeline (that’s the number I used, but you can use more or less). For the first mask, turn the “feather” up 1 point. On the second mask, turn the feather up to 10 points. For the third, 30 points. For the fourth, 60 points, and for the fifth, 120 points. This way, we’ve actually created what appears to be light surrounding the core of the lightsaber (the original white shape).
The rest is much easier. First, delete the video from that composition (you should be left with 5 white solids on top of a black solid). Then, create a new composition and add the exact same video to it. Drag the original composition into that new composition. You should not be able to see the video because the black layer is in the way. To the right of that composition’s layer, under the “mode” drop-down menu, scroll down to “screen.” Like magic, your glowing lightsaber layer appears over your original video again. With the lightsaber composition highlighted in your timeline, go up to “effects” in the menu at the top and scroll down to “color correction.” Under that category, select “color balance,” which adds the effect to the lightsaber composition layer below. Next, adjust the effect to your liking. For a vibrant blue or red, I have been turning the shadow, midtone, and highlight all the way up for the color I have chosen (your options are blue, red, or green).
When you play this back, you should have a pretty solid lightsaber effect. Other tricks of the trade include widening the shape of the lightsaber when it is moving quickly and adding sound effects later to create the full impact of the effect.